How to Install Shake Siding?
Shake siding can give a home crisp shadow lines and a warm, textured exterior, but its appearance depends on careful installation. Each course must overlap correctly, and small mistakes around windows can invite water behind the boards. The work starts with a dry, sound wall, a suitable water-resistive barrier, and flashing detailed for the specific product. Measure the exposure carefully. A chalk line helps keep each row level, while staggered joints create a more natural pattern. Manufacturer instructions matter: wood, fiber-cement, and engineered-wood shakes do not share identical fastening, spacing, or clearance requirements.
The financial stakes are worth considering. Zonda’s 2024 Cost vs. Value report estimates an average U.S. fiber-cement siding replacement project at $20,619, with an estimated resale value of $18,230. That is a useful benchmark, not a price quote for shake siding; material, home size, and local labor can change costs substantially. For installation details, follow the product’s current instructions and applicable guidance from organizations such as the APA–The Engineered Wood Association. Keep fasteners straight, preserve required ground clearance, and pay close attention to roof-wall intersections. Those details are easy to rush. I would not treat a neat-looking first course as proof that the wall is protected; flashing and drainage are less visible, but just as important. This guide explains how to install shake siding, check each stage, and recognize when an experienced installer should handle tricky details.
Select Shake Siding and Confirm Its Required Exposure and Fastener Schedule
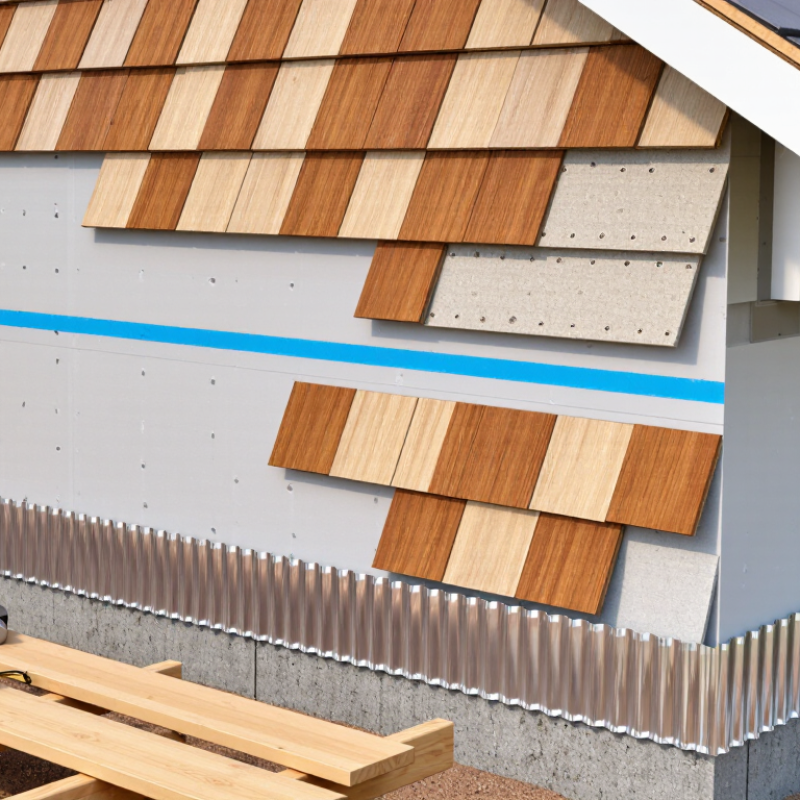
Select shake siding by checking its material, thickness, finish, and installation instructions before opening the first bundle. Exposure is the visible face of each shake after the next course overlaps it. It affects appearance and water shedding, so do not assume one exposure suits every product. Mark the specified exposure on a story pole, then transfer it to the wall with level chalk lines. For natural wood shakes, the USDA Forest Products Laboratory’s Wood Handbook reports that wood’s fiber saturation point is commonly around 30% moisture content; below that point, moisture changes can cause shrinkage or swelling. Let shakes acclimate as their instructions require. I still recheck the first few courses—small layout errors can travel upward.
Confirm the fastener schedule in the product instructions and applicable project requirements. Check fastener type, corrosion resistance, length, placement, and required penetration; these details vary with shake material, sheathing, framing, and wind exposure. Use the specified exposure and fastening pattern rather than copying a schedule from another wall. Fasteners driven too deep can damage the shake; proud fasteners can interfere with the next course. A quick test panel helps reveal both problems.
Tips: Keep the schedule and a tape measure nearby. Mark exposure on a scrap board, and inspect each course before moving your ladder. If the instructions leave a detail unclear, pause and verify it instead of guessing.
Inspect the Wall and Lap the Weather-Resistive Barrier by at Least 6 Inches
Before installing shake siding, inspect the wall from the bottom plate to the eaves. Look for soft sheathing, raised fasteners, open joints, and dark staining around windows. Replace damaged sections and correct obvious water-entry points before covering them. A flat, sound surface helps the shakes sit evenly. It also makes later leaks easier to trace.
Install the weather-resistive barrier in shingle fashion, with upper sheets draining over lower sheets. Lap vertical seams by at least 6 inches, as specified in U.S. Department of Energy Building America guidance for water-managed walls. Keep the overlap smooth; a folded edge can create a channel behind the siding. Extend the barrier over flashing so water moves outward, not into the wall. Small details matter. A neat-looking wrap is not proof that every seam drains correctly.
Tips: Mark 6 inches on your tape measure, then check each seam as you work. Photograph repaired areas before covering them. Pay extra attention to corners and window heads; these spots are easy to miss when the wall looks dry. Recheck the lap after fastening, since a shifted sheet can quietly reduce the overlap.
Install Flashing and Establish 6-Inch Ground and 2-Inch Roof Clearances
How to Install Shake Siding?
Plan the flashing and clearances before fastening the first shake. Check the wall for a sound, dry surface, and mark the locations of windows, doors, corners, and roof intersections. Install flashing so water drains outward over the layer below it. At windows and doors, fit head flashing above the trim; at roof-wall joints, use step flashing and a kickout where the roof ends. Keep drainage paths open. Avoid sealing over weep gaps or directing water behind the siding.
Leave at least 6 inches between the bottom edge of the siding and the finished ground. Measure from soil or landscaping, not from a temporary pile of gravel. The ground should slope away from the wall, though it is easy to miss a low spot near a corner. Keep shakes at least 2 inches above the roof surface. This gap helps reduce moisture exposure and gives roof runoff room to move. Check the siding manufacturer’s instructions and local requirements, since details can vary.
Before installation, use a level and tape measure to mark both clearance lines around the building. Check them again after grading or roofing work; small changes can reduce the gap. Use flashing materials compatible with the siding and surrounding components, and lap each piece to shed water. A neat-looking joint is not enough. Water needs a clear route out.
How to Install Shake Siding? - Install Flashing and Establish 6-Inch Ground and 2-Inch Roof Clearances
| Installation Stage |
Requirement or Measurement |
Installation Check |
Purpose |
| Prepare the wall |
Install a suitable water-resistive barrier over the wall sheathing, following its installation instructions. |
Lap upper layers over lower layers so water can drain outward; seal and detail openings as specified. |
Helps direct water that gets behind the siding toward the exterior. |
| Flash windows and doors |
Use flashing compatible with the window or door and wall water-management details. |
Integrate sill, jamb, and head flashing with the water-resistive barrier; place head flashing above the trim where required. |
Reduces the chance of water entering around openings. |
| Flash roof-to-wall intersections |
Install step flashing along sloped roof-to-wall joints; use kickout flashing at the lower end where the roof meets a wall. |
Make sure each flashing piece sheds water over the layer below and directs runoff away from the wall. |
Helps prevent roof runoff from being trapped behind the siding. |
| Set the ground clearance |
Maintain at least 6 inches between the bottom edge of the siding and finished soil or landscaping. |
Measure from the lowest siding edge to the finished grade; keep soil and mulch from contacting the siding. |
Limits exposure to splashback, soil moisture, and debris. |
| Set the roof clearance |
Maintain at least 2 inches between the bottom edge of the siding and the roof surface. |
Check the gap along the roofline and keep the siding clear of shingles or other roofing materials. |
Allows drainage and reduces prolonged contact with wet roofing materials. |
| Install shake courses |
Follow the siding product’s specified exposure, overlap, fastening, and joint-spacing requirements. |
Keep courses aligned and stagger joints as directed; use corrosion-resistant fasteners suitable for the siding and exposure conditions. |
Supports consistent coverage and secure attachment. |
| Final inspection |
Confirm flashing continuity and verify both clearance measurements after grading and trim work. |
Check that drainage paths are unobstructed and that siding does not bridge the required gaps. |
Catches installation issues before they lead to moisture damage. |
Clearance values shown are common installation targets. Always confirm requirements in the siding instructions and applicable local building codes, which may specify different clearances or details.
Set the Starter Course and Align Each Row to the Manufacturer’s Exposure
How to Install Shake Siding?
Set the starter course straight and level; every row above it depends on that reference. Use the project’s specified starter detail, then measure the exposed face of several shakes. Follow the siding manufacturer’s exposure requirement rather than relying on a generic spacing rule. Mark that measurement on a story pole, and transfer it to both ends of the wall. Snap a chalk line between marks. Dry-fit a few pieces first. This catches uneven edges before they become a crooked row. Stagger joints between courses, and keep nails positioned as the installation instructions specify. Don’t force a shake to meet the line.
Wood can change with moisture. The USDA Forest Products Laboratory’s Wood Handbook (FPL-GTR-282, 2021) reports tangential shrinkage of roughly 6–12% for many wood species from green to oven-dry conditions. That is not the expected movement of installed siding, but it shows why material condition and consistent spacing matter. Check the exposure every few rows, especially near corners and openings. Small checks matter. A chalk line can drift, too; remeasure instead of trusting it blindly.
Tips: Keep a short offcut as a quick exposure gauge. Check that the starter course stays level, and pause if the reveal begins to vary. A rushed correction can leave a visible pattern. I’d rather recheck than hide it.
Fasten Shakes to the Specified Substrate and Seal Openings per Manufacturer Instructions
Before installing shake siding, inspect the substrate for rot, loose sheathing, and uneven areas. It should be sound, dry, and prepared exactly as the siding manufacturer specifies. Confirm the required fastener type, length, spacing, and penetration depth for that substrate. Do not guess. A fastener that misses framing or sits proud can leave a shake loose or distort its edge. Keep each course aligned, and check exposure with a story pole rather than judging by eye. Small details matter.
Follow the manufacturer’s instructions for flashing and sealing around windows, doors, corners, and utility openings. Use compatible sealant only where specified; sealing every gap can trap water behind the siding. Preserve any required drainage or ventilation paths. The USDA Forest Products Laboratory’s 2021 Wood Handbook reports tangential shrinkage of roughly 5–10 percent for many wood species from green to oven-dry conditions. That range is not an installation allowance, but it shows why moisture and movement deserve attention. Leave the prescribed clearances, and never force tight joints. I still recheck the first courses; a small alignment error can travel up the wall. After fastening, inspect corners and penetrations closely, then seal only the openings and joints identified in the product instructions.